A Step-by-Step Guide to Salesforce REST API Integration for Apex Developers
Author: Ismail Basser, Salesforce Consultant at Bluewave Technology
Introduction
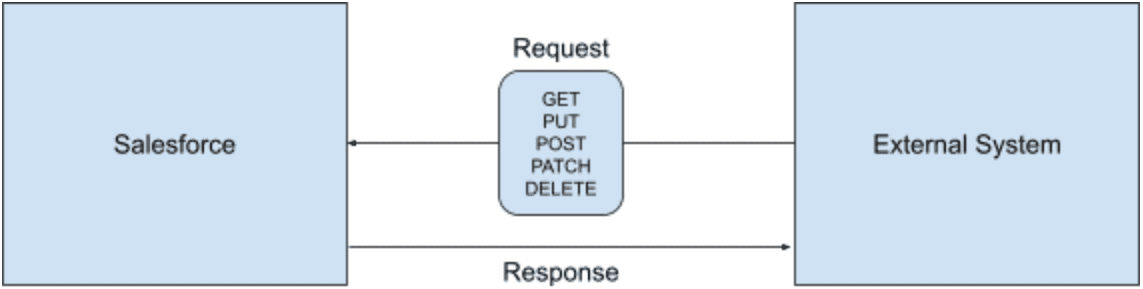
Recently, I developed a solution with the Salesforce Rest API and found the experience a bit cumbersome simply because existing documentation was somewhat limited and scattered for my needs. The below retrospective sets out to provide readers with a comprehensive overview on REST API development that I myself would have found useful. I’m going to try to bridge some documentation gaps while walking through the setup of an example inbound REST API integration between a Salesforce org and an external system as depicted in this diagram.
But first. Why would you do this?
Complex business processes sometimes rely on data between Salesforce and an external system. To enforce custom business logic, we might deploy a custom apex class to help us handle data operations between these systems. To begin, we need to authorise an external system to connect to Salesforce (in 2 Steps). After the connection is established, the external system can successfully make API calls to Salesforce and receive responses.
Step #1 Authorisation using a Salesforce Connected App
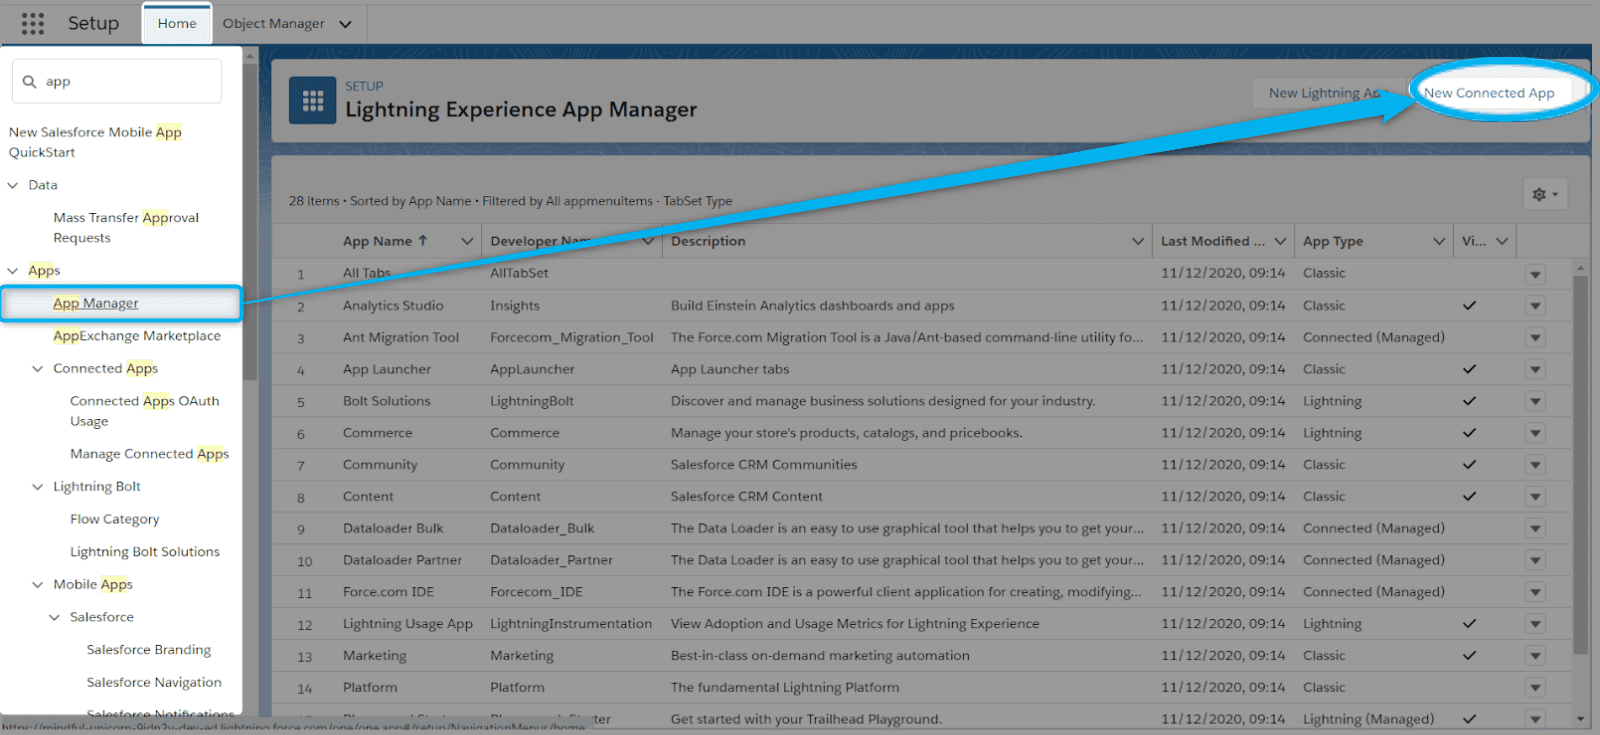
Connected apps allow external systems to securely connect with Salesforce. An HTTP POST call is made to Salesforce and an access token is passed back. This access token is then used as the bearer token when making API calls to Salesforce. Let’s go ahead and create a new connected app in Salesforce. To do this, we’ll navigate to “App Manager” then select “New Connected App”. LEX Click Path: Setup > Apps > App Manager > New Connected App.
 Interested to learn more about how connected apps integrate external applications with Salesforce? Continue on Trailhead.
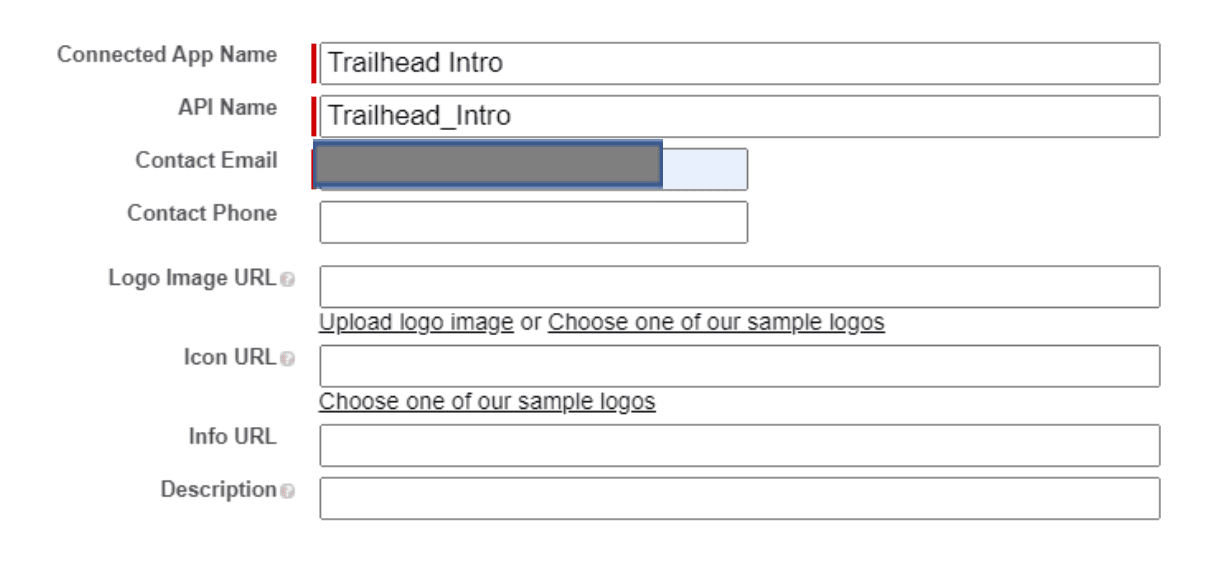
We will input high-level app configuration details like the connected app name and associated email. The app name might identify the external system which will rely on this connection and the associated email might be an IT support email account.
 Next is the API (Enable OAuth Settings) section within the connected app details. In most cases, the Callback URL will be “login.salesforce.com” or if you’re using a Salesforce sandbox “test.salesforce.com.” Below you’ll see I specified “trailheadapp://auth/success” as per the instructions to complete a Trailhead Module.
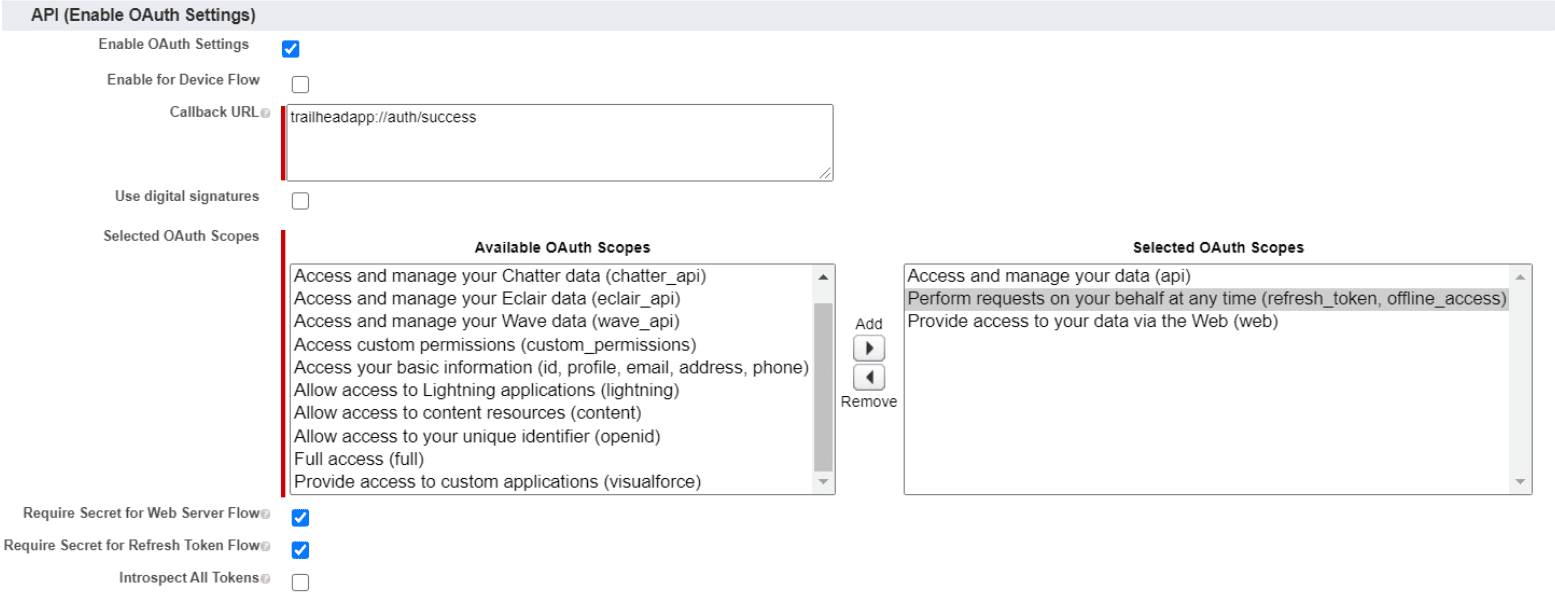
1.) Ensure you mark all of the following as true. A.) Enable OAuth Settings B.) Require Secret for Web Service Flow and C.) Require Secret for Refresh Token Flow.
2.) Ensure that the “Selected OAuth Scopes” includes: A.) Access and manage your data (api) B.) Perform requests on your behalf at any time (refresh_token, offline_access) and C.) Provide access to your data via the Web (web).
3.) Ensure this new connected app is assigned to the user that will login to make the API calls (most likely an Integration User). You can accomplish this by either updating that user’s profile or by creating and assigning a permission set.
Step #2 The HTTP POST Call into Salesforce for Authentication
For this demonstration, I will substitute Postman as a mock external system to make the POST callout to Salesforce. The URL below is required. A request body is not needed. If using Postman, you will notice how the parameters start to auto-populate. (If in a sandbox, then the URL will be test.salesforce.com……)
The HTTP POST Callout URL
| https://login.salesforce.com/services/oauth2/token?grant_type=password&client_id=[CONSUMER_KEY] &client_secret=[CLIENT_SECRET]&username[SALESFORCE_USERNAME]&password=[SALESFORCE_PASSWORD+SECURITY_TOKEN] |
The URL Parameters
| Parameter | Value |
| grant_type | password |
| client_id | This is the consumer key from the related Salesforce connected app |
| client_secret | The client secret from the related Salesforce connected app |
| username | The Salesforce username of your Integration User |
| password | The Salesforce Integration User’s password and security token concatenated (without spaces) |
Example in Postman
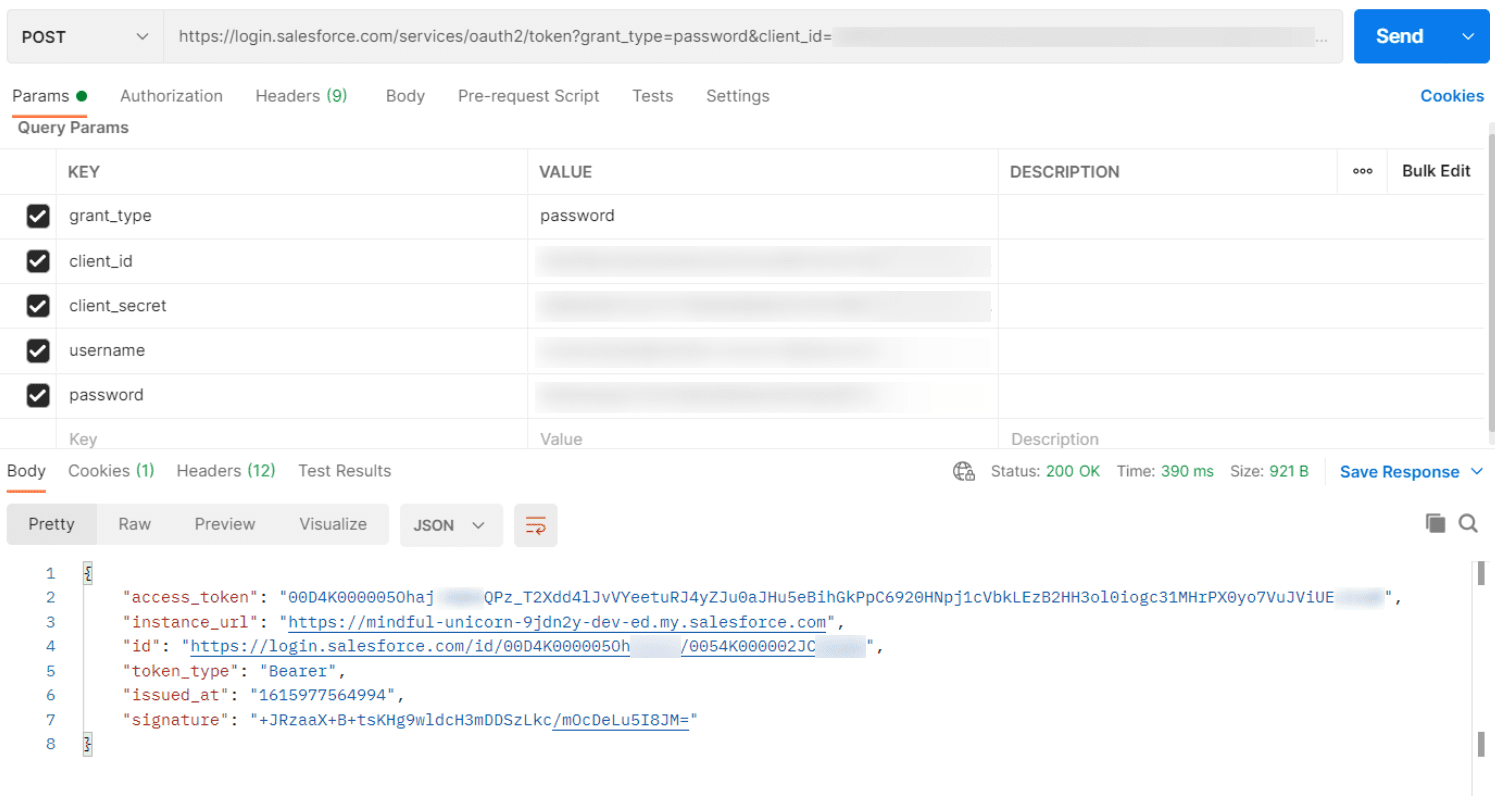
You will then receive an “access_token” that you can use to make an API call into the Salesforce org.
REST API Calls
For any HTTP calls made to Salesforce, you will need to add the following two parameters to the header of the request. This is for the request from the external system into Salesforce.
| Parameter | Value |
| Authorization | Bearer [access_token] |
| Content-Type | Application/json |
Here’s an Apex REST Code Sample to demonstrate how to implement a simple REST API in Apex with three HTTP request methods to delete, retrieve, and update a record. For my own Apex class, I’ve implemented the following URL Mapping.
@RestResource(urlMapping='/Account/*')Get Call
An HTTP GET call is used to retrieve data from Salesforce, in this example we will retrieve some information about an account record based on the Id we provide. As I have created an Apex class with a URL mapping to handle the inbound GET API call, we will need to use a custom URL. For this reason, we will use the URL displayed below.
https://UM6.salesforce.com/services/apexrest/Account/0014K00000Aus8dQABNote that “UM6” is the Salesforce instance and “0014K00000Aus8dQAB” is the Salesforce account record id. A request body is not needed for a GET.
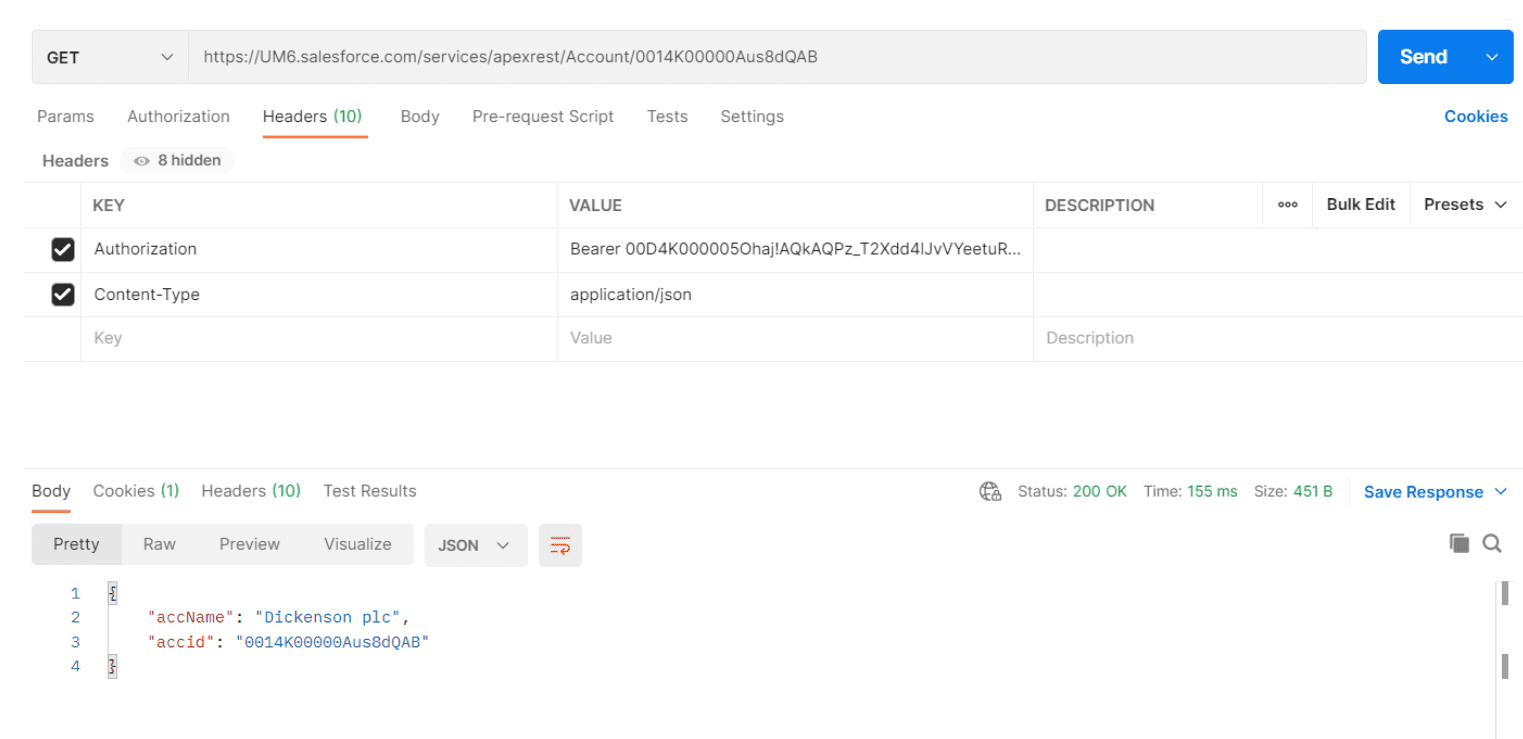
The response of this GET API call returns the account record’s name (accName) and Id (accid). This is because the following wrapper class is used for the response (this is an inner class).
global class AccountWrapper {
    public String accid{get; set;}
    public String accName{get; set;}
}
And the Apex method that handles the GET call looks like so…
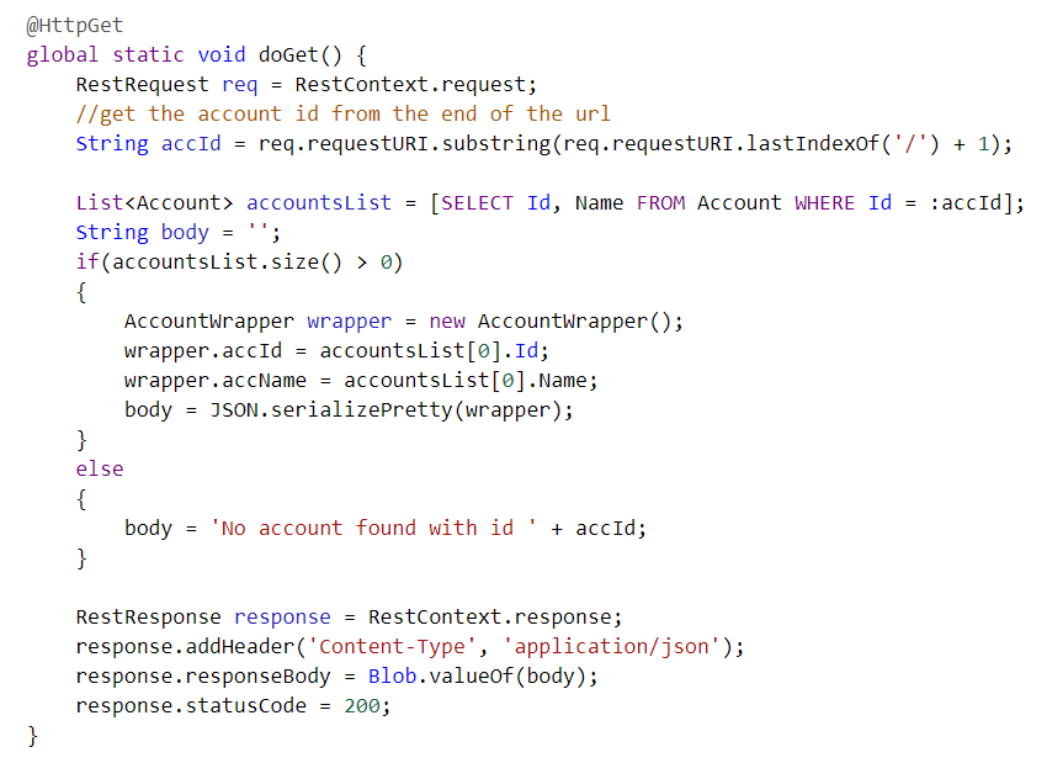
This Apex method extracts the account record id from the request and runs a SOQL query to determine if there are any account records with that Id. If an account record is found then the wrapper is constructed to be sent as the response body otherwise the response body will output a message “No account found with id [Id from request]”.
Post Call
An HTTP POST call can be used to send account information into Salesforce to create a new account record and then Salesforce might return some information. In this example, we will send the account name and description to be used for the new account and then Salesforce will send back the resulting new account record Id and name. As I have created an Apex class with a URL mapping to handle the inbound POST API call, we will need to use a custom URL. For this reason, we will use the URL displayed below:
https://UM6.salesforce.com/services/apexrest/Account/


The incoming request for this POST API call takes in the account name and description as you can see in the body of the postman call. This is because I used the following wrapper class for the request.
global class NewAccountRequest{
    public String name{get; set;}
    public String description{get; set;}
}
The response of this POST API call returns the account name and the account id. This is because we are using the same account wrapper class again as we did for the response in the Get call example above. The Apex method that handles the POST call is:
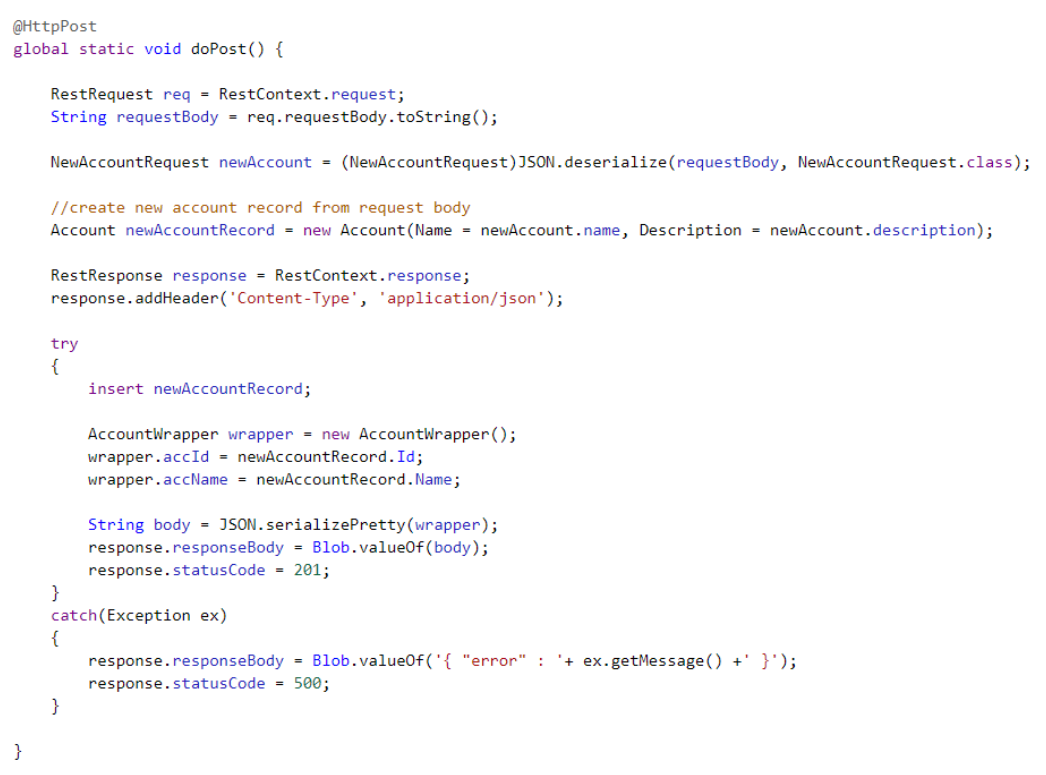
This doPost() method extracts the account name and description from the incoming request and builds a new account record from it. Subsequently, a new account record is inserted into Salesforce and the record Id of the new record along with the name is used to build up the wrapper class for the response body. If there are any errors while trying to insert the new account record then the response body will return the database error message.
Summary
Above are simple examples of GET and POST API calls which are the most common REST API calls. A POST call can be complex to handle as it takes in a request, will run some logic based on the request body and then will return a response. The other REST API methods (PUT/PATCH/DELETE) will be handled in a similar manner.
For the DELETE method, you must add the record Id to the end of the request endpoint (like the GET method) and then the record will be deleted in Apex. The response to a DELETE call has no body and will simply be a status code.
For the PUT method, this is an upsert call so a record can either be updated or created. The request URL will be the same as the POST method. The record Id will be included in the body of the request. The PUT method in Apex will check if there is an existing record with that id, if there is then the record will be updated with information from the request body. If no record is found in Salesforce then a new record will be created with the information from the request body.
For the PATCH method, this is an update call. The request URL will be similar to the GET method where the record Id is attached to the end of the URL. A request body will also be included with information that the Salesforce record should be updated with. The Apex method will extract the record Id from the URL and will run a SOQL to see if a record is found in the system. If a record is found then the record will be updated with the information from the request body, otherwise nothing will happen in Salesforce.
Continue to learn about Writing Unit Tests for RESTful Apex Methods.
Further Resources
- Salesforce Developers Blog “Explore the Salesforce APIs with the Upgraded Postman Collection“
- Salesforce Github Repository forcedotcom/postman-salesforce-apis
- Learn to use REST Explorer in Workbench and leverage the standard REST API