Did you ever receive an email from Salesforce to let you know a Flow you developed has failed? It’s not exactly a welcomed subject line, particularly if that Flow has already been deployed to Production. What if you could have predicted the throughput of that Flow and developed with those limitations in mind? You might have avoided the error altogether. Lots of declarative developers, the ‘point-and-click’ solution designers, have a love-hate relationship with Lightning Flow because for all its power it seems to frequently and mysteriously fall over. Let’s demystify the reasons behind it.
Setting the Stage

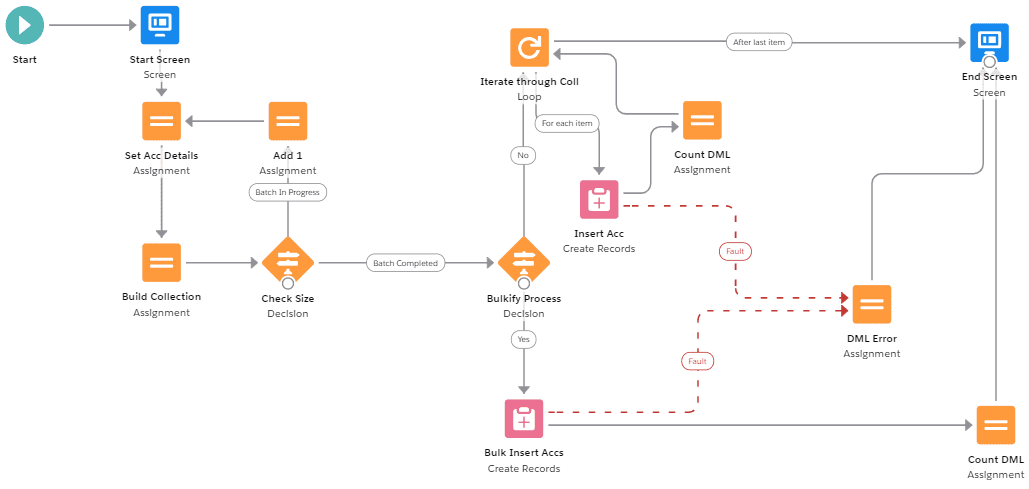
Examine the Flow design in this screenshot. This Flows only purpose is to create new Account records. And for simplicity, there are only two inputs on the Start Screen.
- Batch Size (Number – The amount of Account records to be created)
- Bulkify (Boolean – Indicates which design approach we should use)
These two inputs allow the Running User to set the total number of new Account records to be inserted in the database and whether or not to insert these records individually (one-at-a-time) or in-bulk during the same transaction. If you’re already a bit confused, don’t worry because we will elaborate.
Provided only the top-level Flow design visible in the screenshot, could you make any predictions about this design’s maximum throughput? By ‘throughput’ we refer to the volume of records this Flow can successfully process before an error occurs. Maybe you’re wondering, how does someone calculate throughput of a Flow, anyhow?
The Answers
For this Flow design, if the Running User selects to bulkify the process (Bulkify = TRUE) then the maximum number of Account records this Flow could insert before a Governor Limit is reached would be 499 records. However, if the Running User does not select to bulkify the process (Bulkify = FALSE) then the maximum number of Account records (created one-at-a-time) would only be 150 records.
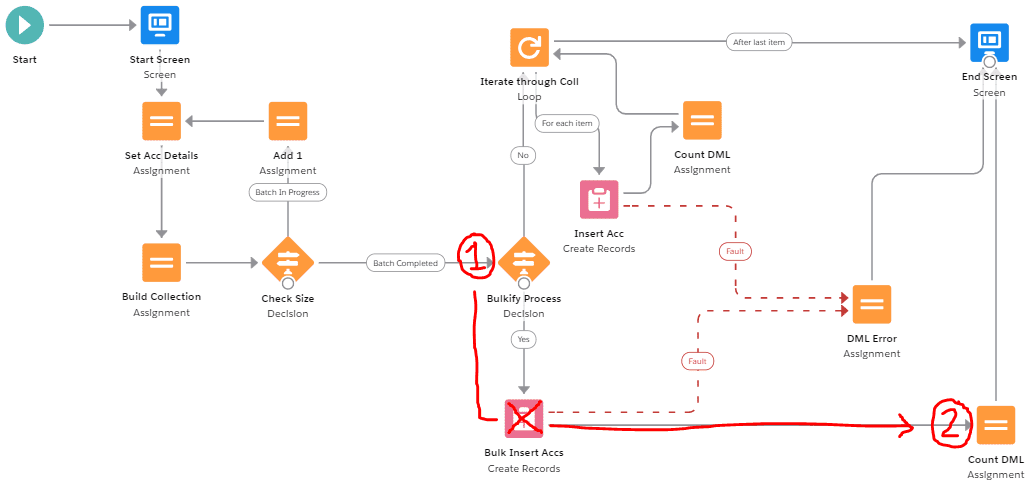
From 499 down to 150 is approximately a 70% decrease in operational capacity! This huge difference can be attributed to where the Create Records Element (DML) is placed in our design. When the Running User sets Bulkify = TRUE, we visit a single ‘Bulk Insert Accs’ (DML) whereas when the Running User sets Bulkify = FALSE we visit the ‘Insert Acc’ (DML) nested inside of a Loop Element so that every individual insert operation is counted against our total limit.
Why is Flow Bulkification Best Practice?
You may have heard or read something about Flow Bulkification before however if you have not it really is quite a simple concept: Bulkification is the practice of optimizing a Flow design by leveraging Flow Resources like Record Collection variables and Fast Elements to avoid unnecessary overuses of DML.
What does DML stand for? That refers to the Salesforce Data Manipulation Language or anytime you create, update, or delete records in the database. These operations can only be performed a certain number of times in a single transaction (or run of the Flow).
In general, and where possible, always avoid placing DMLs inside of Loop Elements, rather assigning utilizing Collections within the Loop and then executing DML operations outside the Loop after it has concluded.
The Calculus of Throughput Projections
Before we begin, let’s familiarise ourselves with the relevant Governor Limits for a single transaction. Be aware that there are other limits than the ones listed below, but these are the ones that matter for this specific Flow design. Also, consider that it won’t matter which of these limits we encounter first, once we reach any limit – we will hit an error so we want to be mindful of them both!
Single Transaction Limitations
| Apex Limitation: Total number of DML statements | 150 |
| Flow Limitation: Executed elements at runtime per flow | 2,000 |
These Governors mean that we can only ‘visit’ 150 DMLs within our transaction. And we can only ‘visit’ a total of 2,000 Elements (excluding Screens and DMLs) during execution. Anything over either of these limits and you’ll be receiving some ugly error messages in your inbox. Now, let’s start counting…

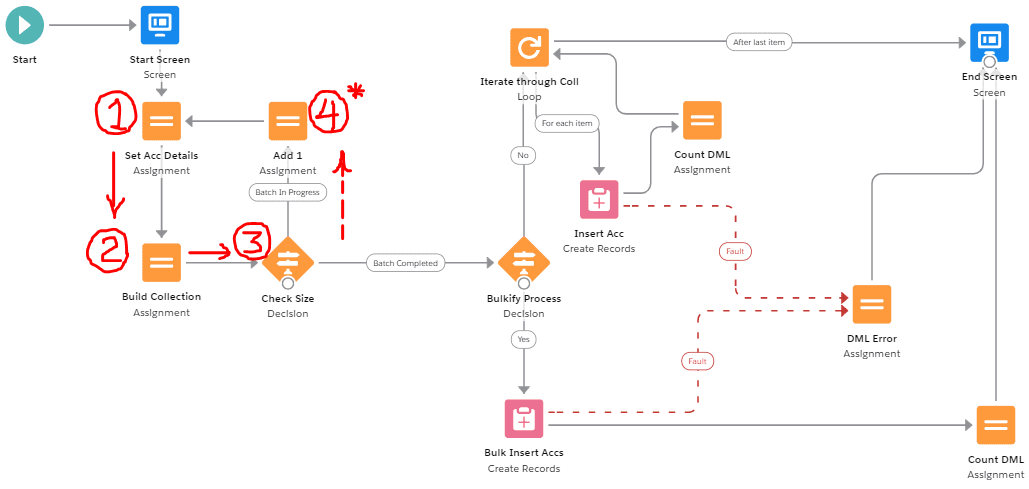
Imagine the moment after our Running User initiates the Flow (after populating the inputs on the Start Screen and after clicking ‘Next’). There are three elements (the third being a decision ‘Check Size.’ Let’s pause here and discuss this first decision, what it is doing and how it may influence the behaviour at runtime and subsequently, the math of our throughput projections.

This first Decision checks to see if the number of Account records that have been added to the Collection variable matches the number of Account records the Running User requested in the Start Screen. When it does match, we consider the ‘batch completed’ and move on, else we continue adding Accounts by appending ‘1’ to the Account Name in a logical loop of Assignment Elements.
During the first iteration we would visit a total of only three Elements including the first decision, fail to meet the criteria (because 1 new record != 100 requested records) and so we would commence circling as our Collection variable builds up to 100. The subsequent 99 iterations after the 1st iteration would follow a different path which incorporates an additional Assignment Element. Here’s what it would look like represented as an equation.
| Equation for calculating the executed elements at runtime
Where n = the number of Account records requested |
3 + 4(n-1) |
| Where n = 100 (the users requested amount) | 3 + 4(100-1) |
| 3 + 4(99) | |
| 3 + 396 | |
| Total executed elements at runtime | 399 |
We take one from n (n-1) to compensate for the fact that the first iteration is unique. Instead we simply add three (+3) to the equation as a one-off to represent the number of elements visited. Notice how quickly the total number of executed elements adds up! 399 executed elements already, geesh! OK – So we are not done yet. Let’s continue this element counting process for the rest of the Flows design.

After the Flow compiles the requested number of new Account records, we move on to one additional Decision Element ‘Bulkify Process.’ First, let’s assume the Running User chose to bulkify this process. If Bulkify = TRUE, encounter only one ‘Bulk Insert Accs’ DML and then one ‘Count DML’ Assignment Element before heading to the End Screen. So we can update and finish our equation as follows:
| First section of the Flow up to the first Decision Element | 3 + 4(n-1) |
| Second section of the Flow up to the End Screen | 2 |
| Completed equation for all executed elements at runtime | 3 + 4(n-1) + 2 |
| Completed equation (tidied up a bit) | 5 + 4(n-1) |
Remember: Ignore Screens and DMLs when counting Executed Elements
In order to solve for the maximum throughput of this Flow we can balance the executed elements equation we created against the known Governor Limit like so…
| Total executed elements at runtime per flow is 2000 | 2000 = 5 + 4(n-1) |
| 2000 – 5 | 1995 = 4(n-1) |
| 1995 / 4 | 498.75 = n-1 |
| 498.75 + 1 | 499.75 = n |
| Considering we cannot create partial records we round down | 499 |
Tada! The max throughput for this Flow before a Governor Limit is reached is 499.
Error Messages Decoded
What happens if the Running User were to request 500 new Account records from our current Flow design rather than 499? In this case, the Flow would fail when it surpassed the allowable limit of Executed Elements and a fault message would be generated.
Email Subject: Error Occurred During Flow: Number of iterations exceeded
Maybe you have seen the above message in your own Inbox before. Next time you see it you will know exactly why you received it! Too many Executed Elements in a single transaction.
In the Calculus of Throughput Projections section, we solved for n against the executed elements limit of 2000 only. What about that DML limitation of 150 statements per transaction? Well we were actually able to insert all 499 of those new Account records with just one DML so we didn’t come anywhere close to the limit.
However, if the Running User had set Bulkify = FALSE the Flow behavior would have been different as it followed a different path at runtime. Using a Loop Element, if the requested number of new Account records had been 499 we would have started racking up the DMLs like crazy inside of the Loop until the 151st iteration when the Flow would fail and a fault message would be generated.
Email Subject: Error Occurred During Flow: Too many DML statements: 151
Another common Governor Limit for Flow we did not have the opportunity to discuss here applies to SOQL Queries, or the Get Record elements useful for searching the database. The Flow example we used had no such elements but they have their own limitation which you should be mindful of when incorporating them into your designs. Generally, avoid nesting SOQL Queries, or the Get Record elements inside of Loops for the same reasons. It’s not bulkified!
To all those mighty ‘point-and-click’ solution designers out there, be mindful of the Apex Governor Limits affecting Flow at runtime. Design with those limitations in mind – and don’t hesitate to bookmark the related documentation for reference. Test and retest your Flow designs, remember to considering mass insert and update operations and hopefully you will deliver happier and healthier automation going forward!
For more on the power of Flow see our Spring’18 presentation at the Dublin Developer Group Meetup here.
Author – Jorgan Strathman
Over to you!
We’d love to hear your own tips using the Form that follows.
Alternatively, don’t hesitate to enquire how Bluewave Technology can assist with any challenges you are facing within your Salesforce environment. We are Salesforce implementation experts with a proven success record for Pardot, Sales Cloud, Service Cloud, Analytics Cloud, Community, Marketing Cloud, Project Management, Salesforce Integration, Salesforce Release Management.